Setting up an Open VPN server on Windows Server 2008/2012
This is a step-by-step guide on how to configure an Open VPN server on Windows Server 2008/2012 operating systems and connect clients to the created virtual private network.
Open VPN is an open implementation of VPN technology - the Virtual Private Network, which is designed to create virtual private networks between groups of geographically distant nodes on top of an open data transmission channel (Internet). Open VPN is suitable for tasks such as secure remote network connection to a server without opening Internet access to it, as if you are connecting to a host on your local network. Connection security is achieved by Open SSL encryption.
How it works?
When the Open VPN configuration is completed, the server will be able to accept external SSL-protected network connections to the virtual network adapter created at the start of the VPN service (tun / tap) without affecting the traffic processing rules of other interfaces (external Internet adapter, etc.). You can configure client sharing Open VPN to a specific network adapter from those present on the server. In the second part of the instruction, this tunneling of users' Internet traffic is considered. With this method of forwarding, the host that handles VPN connections will also perform the function of a proxy server (Proxy) - to unify the rules of network activity of users and to route client Internet traffic on its own behalf.
Installing Open VPN on the server
Download and install version of Open VPN that matches your operating system. Run the installer; make sure that all features are selected for installation in the third step of the installation wizard.
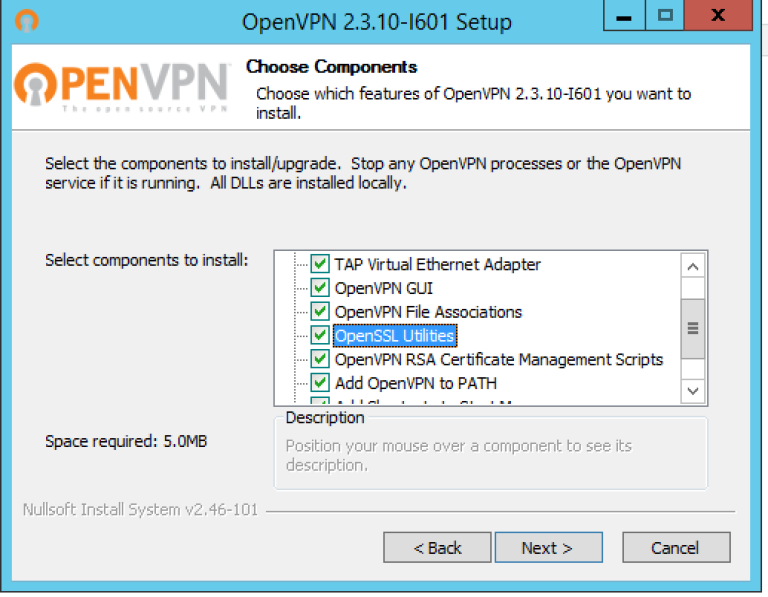
Please note that in this instruction further commands are based on the fact that Open VPN is installed in the default directory "C: \ Program Files \ OpenVPN".
We allow adding a virtual network adapter TAP in response to the corresponding request and wait until the installation is complete (it may take several minutes).
Key generation (PKI) of the certification center, server, client; Diffie-Hellman algorithm
To manage the key / certificate pairs of all nodes of the private network being created, use the easy-rsa utility, which works via the command line, by analogy with the Linux console. To work with it, open, run the command line (Keyboard shortcut Win + R, then type cmd and press Enter)
Configuration files.
Running init-config.bat script will generate a new vars.bat file in our easy-rsa directory, this file will contain our configuration:
cd "C:\Program Files\OpenVPN\easy-rsa"
init-config.bat
So now we need to open up the following directory using Windows Explorer: C:\Program Files\OpenVPN\easy-rsa
Now, using Notepad (or another text editor) edit the batch file named vars.bat, we need to configure some variables…
Change the following settings (nearer the bottom of the file) to meet your requirements:
set KEY_COUNTRY=US
set KEY_PROVINCE=CA
set KEY_CITY=SanFrancisco
set KEY_ORG=OpenVPN
set KEY_EMAIL=mail@host.domain
set KEY_CN=changeme
set KEY_NAME=changeme
Note: if the value of the variable contains a space, enclose it in quotes.
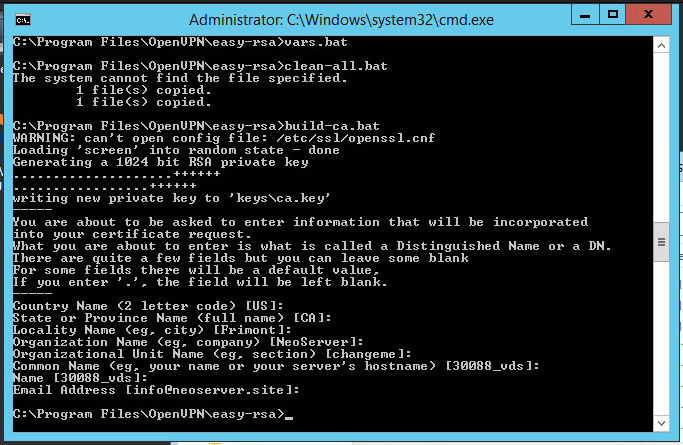
Next you should save the changes to the file and then using Command Prompt, run the following commands:
cd "C:\Program Files\OpenVPN\easy-rsa"
vars.bat
clean-all.bat
Certification Center and Server Key Generation
Let's proceed to the creation of the key / certificate of the certification authority. Run the script:
build-ca.batIn response to the prompts that appear, you can simply press Enter. The only exception is the KEY_CN (Common Name) field - be sure to specify a unique name and insert the same name in the Name field:
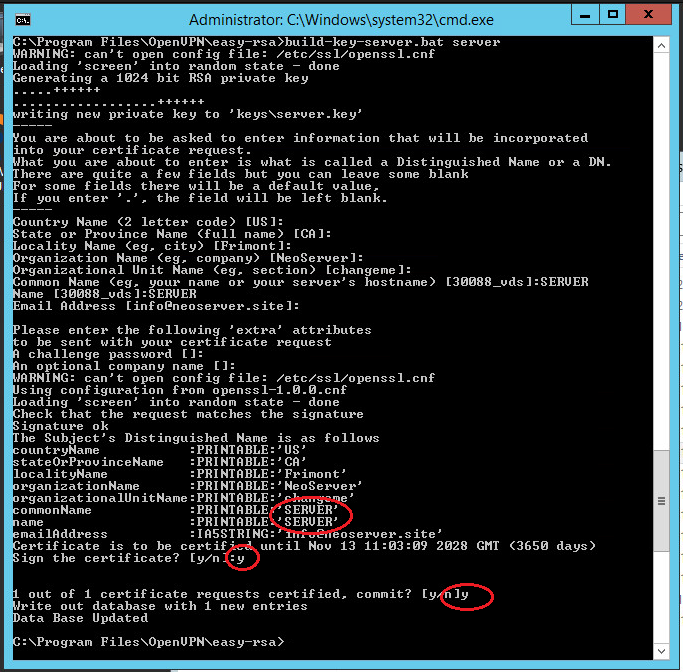
Similarly, we generate a server certificate. Here the value of the Common Name and Name fields is SERVER:
.\build-key-server.bat serverNote: the server argument is the name of the future file.
All generated keys will now be asked whether to sign the generated certificate (Sign the certificate) on behalf of the certification authority. Answer y (yes).
Generating client keys and certificates
For each VPN client, you need to generate a separate SSL certificate.
There is an option in the Open VPN configuration, by enabling which you can use one certificate for several clients (see the server.ovpn file -> "dublicate-cn" file), but this is not recommended from a security point of view. Certificates can be generated in the future, as new customers connect. Therefore, now we will create only one for client1:
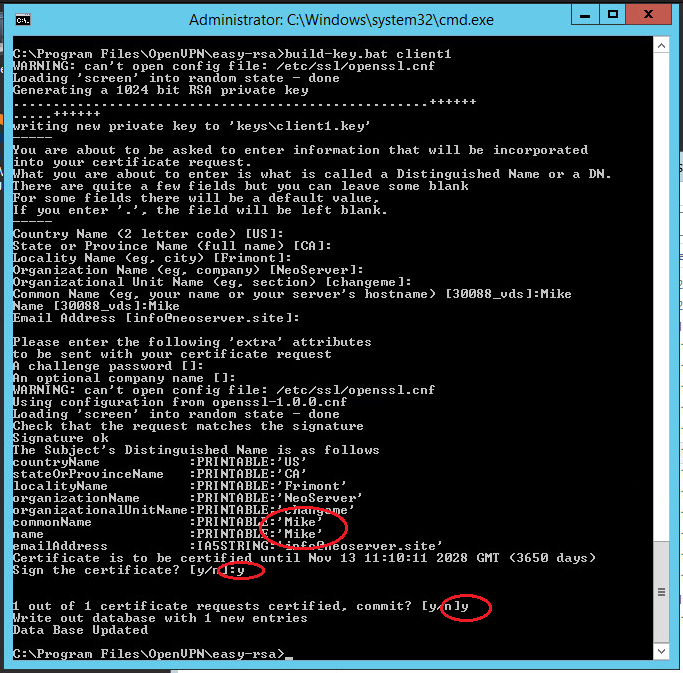
Run the following commands to generate client keys:
cd \
cd "C:\Program Files\OpenVPN\easy-rsa"
.\build-key.bat client1
Note: client1 argument is the name of the future file.
In the Common Name field, specify the name of the client (in our case client1).
Diffie Hellman Parameters
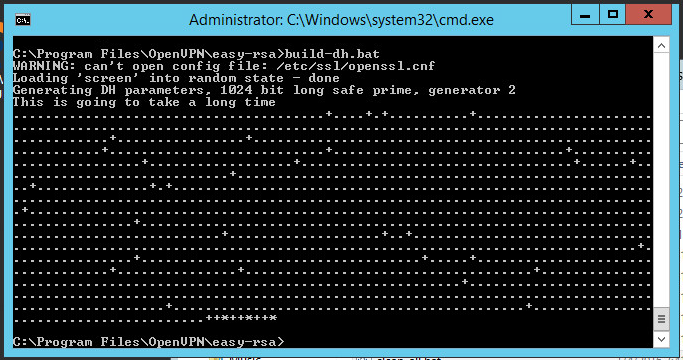
To complete the encryption setting, you need to run the Diffie-Hellman parameter generation script:
.\build-dh.batDisplaying information about creating parameters looks like this:
Transferring generated keys / certificates
The generated certificates are located in the C: \ Program Files \ OpenVPN \ easy-rsa \ keys directory. Copy the files listed below to the directory C:\Program Files\OpenVPN\config:
- ca.crt
- dh2048.pem/dh1048.pem
- server.crt
- server.key
Open VPN server configuration
Let's proceed to the configuration of the VPN server directly, use our configuration file with the name server.ovpn and place it in the C: \ Program Files \ OpenVPN \ config directory.
copy "C:\Program Files\OpenVPN\sample-config\server.ovpn" "C:\Program Files\OpenVPN\config"
copy "C:\Program Files\OpenVPN\sample-config\client.ovpn" "C:\Program Files\OpenVPN\config"
Open the file; find the path to the keys (see below). Check the paths to the previously copied certificates ca.crt, dh1024.pem / dh2048.pem, server.key, server.crt and, if necessary, change:
port 1194
proto udp
dev tun
server 10.8.0.0 255.255.255.0
ca "C:\\Program Files\\OpenVPN\\config\\ca.crt"
cert "C:\\Program Files\\OpenVPN\\config\\server.crt"
key "C:\\Program Files\\OpenVPN\\config\\server.key"
dh "C:\\Program Files\\OpenVPN\\config\\dh2048.pem"
push "redirect-gateway def1"
push "dhcp-option DNS 8.8.8.8"
keepalive 10 120
comp-lzo
persist-key
persist-tun
verb 3
Save the file.
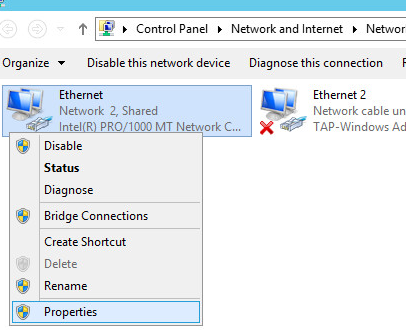
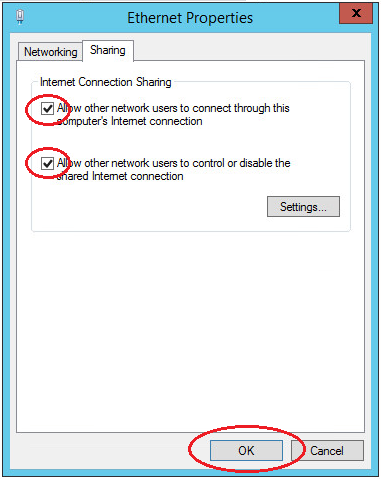
Now you need to allow traffic forwarding between adapters. Follow these steps: Control Panel -> Network and Internet -> Network and Sharing Center -> Change adapter settings. Choose an adapter that looks to the external Internet (TAP-adapter is responsible for the VPN connection). In our example, this is Ethernet 2.
Double-click the adapter Properties and go to the Access tab, tick all the checkboxes. Save the changes.
Next you need to enable IP addressing.
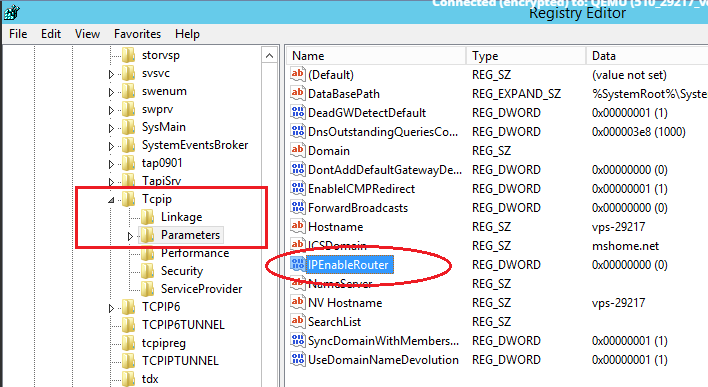
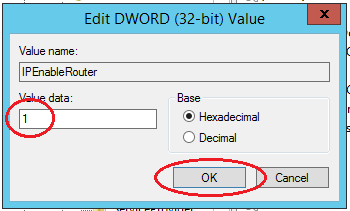
Using Windows Search, locate the REGEDIT.exe application.

In the tree, find the directory HKEY_LOCAL_MACHINE \ SYSTEM \ CurrentControlSet \ Services \ Tcpip \ Parameters. In the right part of the window, find the IPEnableRouter variable, double-click into the value editing window and change it to 1, thereby allowing addressing on the VPS.
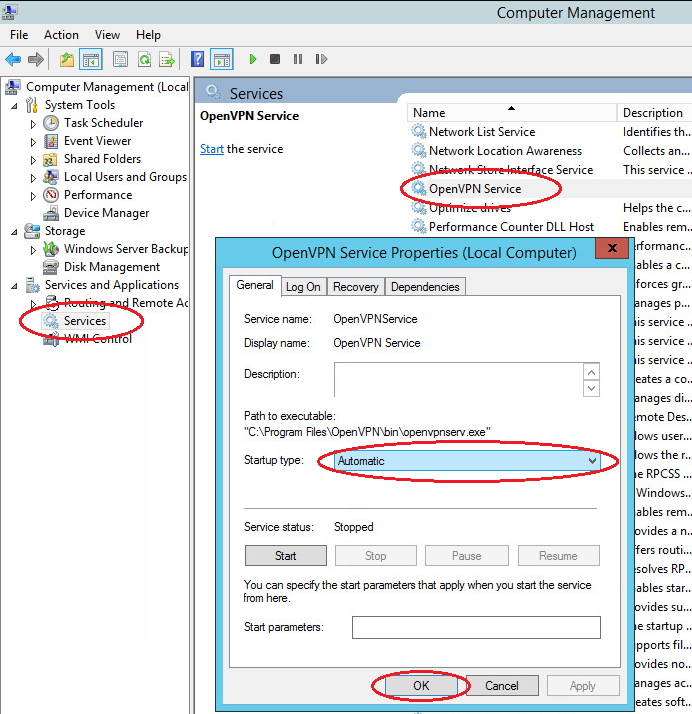
Autorun Open VPN
Immediately configure the Open VPN service to autorun at system startup.
Open the Windows Services. Find in the list Open VPN -> right-click -> Properties -> Start: Automatic
This completes the basic configuration of the virtual private network server. Find the file C: \ Program Files \ OpenVPN \ config \ server.ovpn -> right-click -> "Start OpenVPN on this config" to start the virtual private network server and the configuration file we prepared.
Open VPN Client Configuration
Open VPN client applications are available for all popular operating systems: Windows / Linux / iOS / Android. For MacOS, the Tunnelblick client is used. All of these applications work with the same configuration files. Only some differences of several options are possible. You can learn about them by examining the documentation for your Open VPN client. In this guide, we will look at connecting a Windows client using the same distribution package of the program that we installed on the server. When using applications for other operating systems, the setup logic is similar.
- Install the current version of Open VPN on the client computer.
- Copy to the directory C: \ Program Files \ OpenVPN \ config the client certificate files created earlier on the server (2 certificates with the .crt extension and the key with the .key extension) and use our client.ovpn client configuration file. After copying to the user's device, the last file is deleted from the server or transferred from the config folder to avoid confusion in the future.
-
Open the client.ovpn file. Find the line remote my-server-1 1194 and specify the ip-address or domain name of the vpn-server in it:
remote <ip-address> 1194</ip-address>For example:
remote 83.166.241.155 1194 -
Find ways to certificates. Specify in it the paths to the ca.crt, client1.key, client1.crt certificates copied earlier as in the example below:
# See the server config file for more # description. It's best to use # a separate .crt/.key file pair # for each client. A single ca # file can be used for all clients. ca "C:\\Program Files\\OpenVPN\\config\\ca.crt" cert "C:\\Program Files\\OpenVPN\\config\\client1.crt" key "C:\\Program Files\\OpenVPN\\config\\client1.key" # This file should be kept secret - Save the file. Client setup complete.
Verify Windows Firewall Rules
Attention! For the correct operation of the OpenVPN service, it is required that the corresponding ports be opened on the server (by default UDP 1194). Check the relevant rule in your Firewall: Windows Firewall or third-party anti-virus software.
Check OpenVPN connections
Start the Open VPN server, to do this, go to the directory C: \ Program Files \ OpenVPN \ config and select the server configuration file (we have server.ovpn -> right-click -> "Start OpenVPN on this config file").
Start the client, to do this, go to the directory C: \ Program Files \ OpenVPN \ config and select the client configuration file (we have client.ovpn -> right-click -> "Start Open VPN on this config file").
The screen displays the connection status window. In a few seconds it will be minimized to tray. The green indicator of the Open VPN shortcut in the notification area indicates a successful connection.

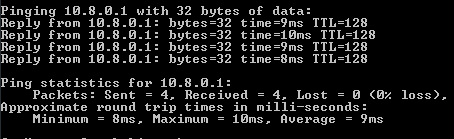
Check the accessibility from the client device of the OpenVPN server using its internal private network address:
- Press the Win + R keys and type cmd in the window that appears to open the command line.
-
Execute the ping command to the address of our server in a virtual private network (10.8.0.1):
ping 10.8.0.1If the VPN is configured correctly, the packet exchange with the server will start.
- With the help of the tracert utility, we will check on which route the packets from the client go. In the console, enter the following command:
From the result of the utility, we see that the packets are first sent to the VPN server, and only then to the external network.
Now you have a ready-to-work virtual private network that allows you to make secure network connections between its clients and the server using open and geographically distant points of connection to the Internet.