Step-by-step installation instructions for Postfix and Dovecot on Ubuntu
This guide will cover the process of installing Postfix, Dovecot email agents on virtual servers running the Ubuntu 16.04 x64 operating system.
What it is
Postfix is an email transfer agent for sharing on the Internet and inside a local network. The advantage of Postfix is the ease of setup and configuration. Can be used to send system messages.
Dovecot is an IMAP and POP3 email receiving agent.
Postfix Installation
First of all, you should update the local package database:
apt-get updateNext, install the postfix package from the main repository:
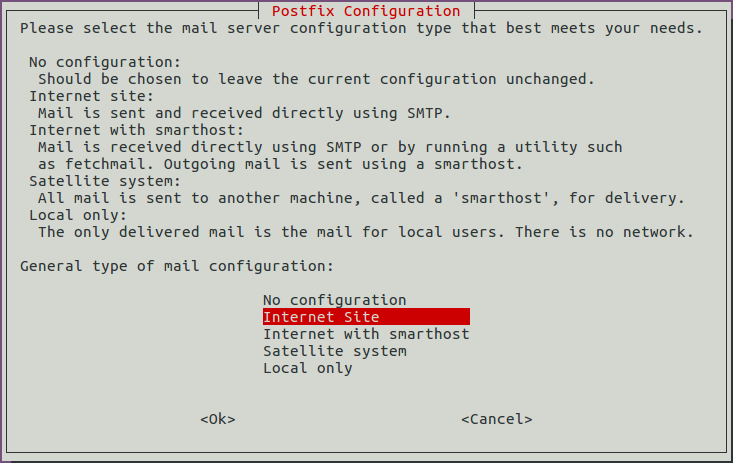
apt-get install postfixAfter launching the user interface, in the list of server configuration types, select “Internet Site” to automatically generate the configuration file main.cf.
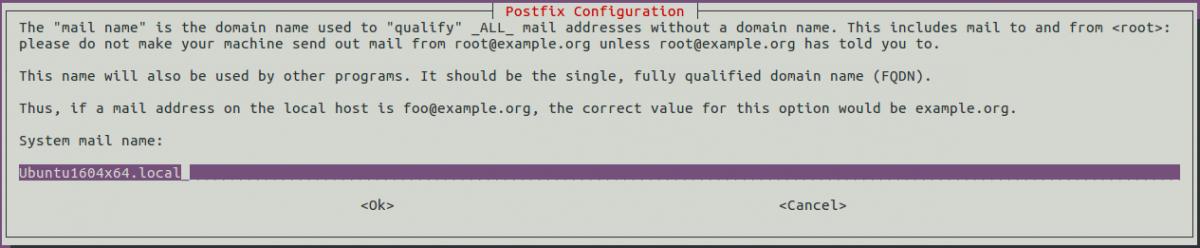
In the "System mail name" field, enter the fully qualified domain name or local server name, for example: example.org.
The server domain name can be viewed using the nslookup utility:
nslookupPostfix Setup
Create a virtual file in the / etc / postfix / directory using the touch command, this file will contain the mailing addresses and the names of the users to whom the mail is delivered:
touch virtualCreate a private directory in / etc / postfix / using the mkdir command, which will store the yandex smtp configuration files:
mkdir privateCreate the following files in the / etc / postfix / private / directory using the touch command:
touch canonical sender_relay sasl_passwdCanonical - sets the rules for address spoofing
sender_relay - sets the connection of domains and specific senders to external services
sasl_passwd - you add external mail provider credentials to this file
Next, you need to make changes to the configuration file main.cf
Open the file in a text editor in privileged mode:
vi /etc/postfix/main.cfRecords look like: parameter = value1, value2, value3. Comments begin with a #.
Change the value of the myhostname parameter to your domain name, if there is no domain name, and then leave the default:
myhostname = example.orgChange the value of the mydestination parameter by adding the value of your ip-address separated by commas. The IP address can be viewed using the following command (inet addr parameter):
ifconfig | grep "inet addr" -m 1To send the letter to other domains or addresses, replace the alias_maps parameter with the virtual_alias_maps parameter.
Change the location of the hash to / etc / postfix / virtual:
virtual_alias_maps = hash:/etc/postfix/virtualThe value of the mynetworks parameter that defines authorized networks:
mynetworks = 127.0.0.0/8 [::ffff:127.0.0.0.0/104 [:: 1] / 128127.0.0.0/8 - Safe: Authorize only the local machine
To send mail using hotmail SMTP, add the following lines to the end of the file:
smtp_sasl_auth_enable = yes
smtp_sasl_password_maps = hash:/etc/postfix/private/sasl_passwd
smtp_sasl_security_options = noanonymous
smtp_sasl_type = cyrus
smtp_sasl_mechanism_filter = login
smtp_sender_dependent_authentication = yes
sender_dependent_relayhost_maps = hash:/etc/postfix/private/sender_relay
sender_canonical_maps = hash:/etc/postfix/private/canonical
Description of parameters:
- smtp_sasl_auth_enable -- the parameter is responsible for enabling sasl support for authentication of mail servers
- smtp_sasl_password_maps -- specify the path to the sasl_passwd file with external credentials
- smtp_sasl_security_options -- security option
Possible parameter values:
- noanonymous — do not use mechanisms that allow anonymous authentication;
- noplaintext — do not use mechanisms that convey an unencrypted username and password;
- nodictionary — do not use mechanisms that are vulnerable to dictionary attacks;
- mutual_auth — use only mechanisms that are authenticated by the client and server with each other.
- smtp_sasl_type -- is the sasl plugin type that should be used for authentication, by default cyrus.
- smtp_sasl_mechanism_filter -- list of supported authentication methods
- smtp_sender_dependent_authentication - authentication -- will depend on the domain of the sender
- sender_dependent_relayhost_maps -- specify the path to the sender_relay file
- sender_canonical_maps -- specify the path to the canonical file
Modify the / etc / postfix / private / canonical file:
@hotmail.com user_name@hotmail.comModify the / etc / postfix / private / sender_relay file:
@hotmail.com smtp.hotmail.comModify the / etc / postfix / private / sasl_passwd file, where instead of xxxxxx specify your password:
[smtp.hotmail.com] user@hotmail.com:xxxxxxTo forward emails to other email addresses, you need to create aliases.
Open the virtual file in a text editor in privileged mode:
vi /etc/postfix/virtualSpecify arbitrary email addresses you need to create and names of existing users who need to deliver mail:
mail@example.org user1

mail2@example.org user1, user2
To view all existing users of the system, run the command:
cut -d: -f1 /etc/passwdConvert the file / etc / postfix / virtual to the files in the / etc / postfix / private / directory into lookup tables using the postmap command:
postmap /etc/postfix/virtual
postmap /etc/postfix/private/*
After making changes to the configuration files, you must restart the service:
systemctl restart postfixOn Ubuntu Server 16, using the iptables command, you need to open ports for mail services:
iptables -A INPUT -p tcp --dport 25 -j ACCEPTPostfix mail service check
For more convenient work with mail, install the mutt utility:
apt-get install muttTo check the correctness of the service, send an email to any mailbox:
echo "First message" | mutt -s "msg" mail@example.comNote: emails sent to Google email addresses are spammed.
Receiving Emails with Dovecot
Install packages from the main repository:
apt-get install dovecot-imapd dovecot-pop3dIn the /etc/dovecot/dovecot.conf file, add the following line with the list of protocols:
protocols = pop3 pop3s imap imapsIn the /etc/dovecot/conf.d/10-mail.conf file, check the contents of the parameter
mail_location = mbox:~/mail:INBOX=/var/mail/%uAfter making changes to the configuration files, you must restart the service:
systemctl restart dovecotModify the / etc / hosts file by adding your domain name:
ip-address example.comNext, using the iptables command, you need to open ports for postal services:
iptables -A INPUT -p tcp --dport 220 -j ACCEPT
iptables -A INPUT -p tcp --dport 993 -j ACCEPT
iptables -A INPUT -p tcp --dport 110 -j ACCEPT
iptables -A INPUT -p tcp --dport 995 -j ACCEPT
To check the correctness of the service, send an email from any mailbox to the created email address and check it with the mutt utility. The letter should be sent only to the existing user and to the address with the domain name, not the ip-address, otherwise the letter will not be received.